Sunday, October 29, 2006

signs of life


A few weeks ago we saw signs that some bulbs planted by a previous owner were pushing through the dirt to the surface. Now we're seeing more and more of them and they are growing like weeds. Hooray! I like to think they're paralleling the changes that we are making to the house. It was once full of life but has lain dormant with no one caring for it. Now that we've cleared away much of the debris, so to speak, the light and warmth of the sun is able to do its work and life is springing back. The bulbs, the house, and we, all have new life.

Saturday, October 28, 2006

itchy and scratchy


Itchy & scratchy is exactly how I felt today after insulating the bathroom wall with fiberglass. I wore a long-sleeved shirt well buttoned up and still those nasty fibers sneaked in under my coverings. This photo shows the beginning of the bathroom demolition I started last week. "That stupid man", as we call the unknown "handy"man who performed half-assed repairs to the house was calling down our wrath again. He had installed a vinyl shower-surround over regular drywall and had not bothered to caulk properly along the edge that met with the bathtub, but had instead put something resembling vinyl shoe-molding around the edges. this allowed water to leak readily into the crack and the result was the sheet rock was crumbling all round the tub, the tub edges were darkly mildewed, and black mold was beginning to creep up the back of the sheet rock. The shower-surround HAD to come out.

I found some fairly inexpensive tile at Lowe's made with recycled material that creates unusual organic patterns on an aqua-colored base tile. The 3x3" tiles come on a 12x12" sheet, enabling you to place 16 of them at at time. I splurged on some dark blue mudcap tiles to give the tiles a more finished look. The mudcaps had to be specially ordered, but arrived yesterday. I hope to pick them up on Sunday (tomorrow).

I finished demolition yesterday and today I installed batts of R-13 fiberglass insulation between the studs. There was also a square place where the "stupid man" had removed a window and then nailed clapboards over some 2x4's he'd screwed into the original studs. I covered the inner side of the clapboards with roofing felt, hoping to keep out some of the wind and moisture and will be caulking them on the outside in the coming days. I have to re-build the "wall" that the "stupid man" built at the plumbed end of the tub and have a real plumber come out to install some cut-off valves for the water and the new tub/shower fixture that I bought. Then the cement board goes up and the tile follows. I'm psyched about doing tile, but today I'm so tired I can't think much about it. I worked 3 days in a row last weekend and 3 days this weekend and when I got home after driving the 40 miles from McKinney I was so stiff I thought I might not move again for a week. The itchies and scratchies had set in full force by then, so I took a shower, applied a heating pad to my shoulders and conked out for about 2 hours. I plan on conking out again shortly, after I get my last clock turned back. It's a great weekend for me to receive an extra hour of sleep!

Tuesday, October 10, 2006

kitchen progression

I see it's been more than a month since I've posted. Had I known how tired i would be I would not have attempted a blog on this project. Good thing we can't see the future!

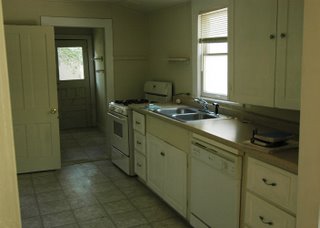
Here's the kitchen before we bought the house. It looks okay but what you can't see is the dishwasher doesn't work, the stove is filthy inside and is leaking a lot of carbon monoxide and the joist under the kitchen floor is broken. There is no storage on the wall opposite the sink and no room for a refrigerator. The sagging ceiling is barely 7 feet high. The wiring is a nightmare. Silly us: we think it can be fixed in no time!


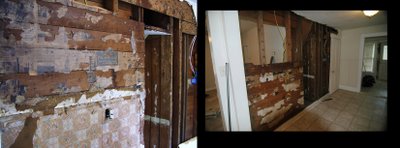
Here's a look at the partially demolished kitchen. It was at this point I began finding a LOT of termite damage and started to wonder how bad things were going to get. I also found interesting relics of the past, including old newspaper and magazine pages pasted to the wall, odd wallpaper and burlap bags used as insulation. These unfinished planks still have the original saw marks on them and were nailed with square iron nails.


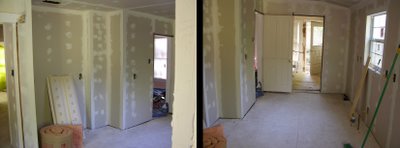
Here's the kitchen after part of the wall has been moved back 24 inches to accomodate a refrigerator, cabinets and countertop. The room has been almost completely rebuilt. There are new piers under the floor, new girders and joists, new subfloor, new wall supports and the wall around the new window has been redone. Fiberglas insulation has been added to ceiling and exterior wall and a radiant barrier has been installed next to the decking of the roof. We now have a working window with double-pane low-e glass. This room should be cozy in the winter.

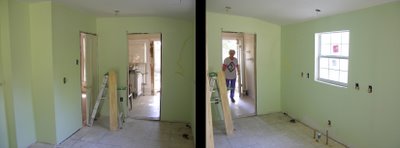
Last weekend I primed and painted the newly plastered walls. This week the flooring, cabinets, electrical fixtures, sink, countertops and trim will be installed. Maybe I'll have a new photo to post next week!